
TestRail Integration for Test Management
TestRail by Gurock offers a web-based test case management software to manage, track, and organize your software testing efforts. TestRail integrates with MantisHub, allowing users to automatically view and create MantisHub tickets directly within the TestRail application.
TestRail offers a cloud-based solution as well as the option to download and self-host. This article will show how to integrate the cloud solution with your MantisHub service. The steps for integration with a self-hosted option will be very similar.
Once you have set up a TestRail service and created your projects and test cases, you can establish an integration to record the results of your test runs. TestRail offers two methods to integrate with MantisHub: Defect URLs and the Defect Mantis Plugin.
Defect URLs
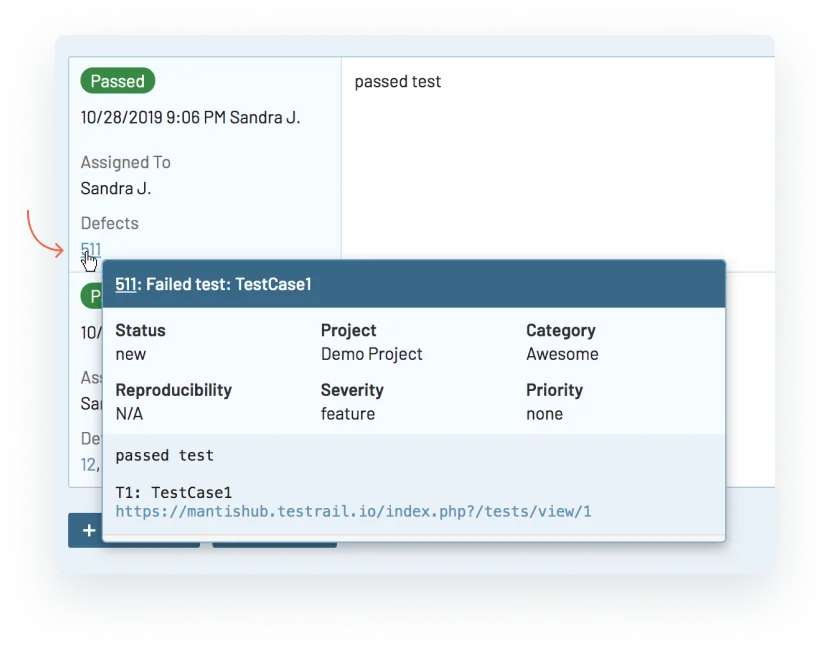
Defect URLs provide a link to your MantisHub. It allows you to simply enter an issue ID and create a live hyperlink to your MantisHub Issue details. These links can be added to test run results and used to navigate to the issue details directly, or you can hover over these links for an update on the issue status.
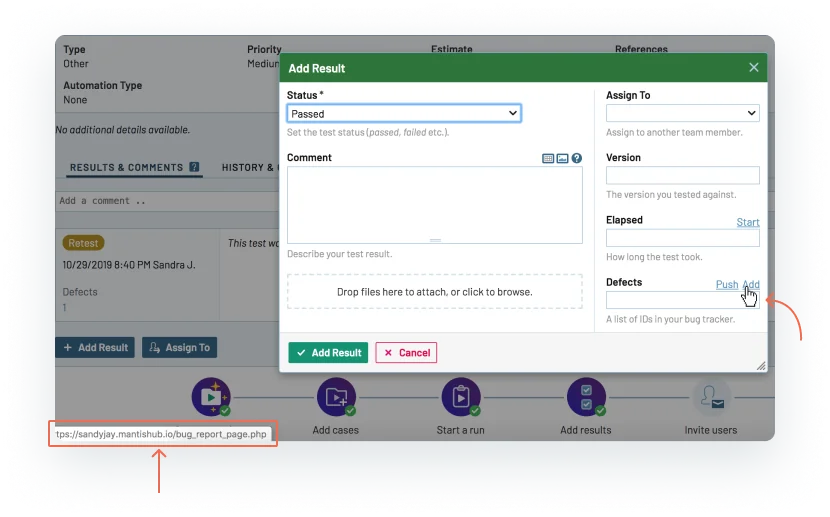
It also provides an 'Add' link to the Report Issue page where you can manually create a new ticket within MantisHub.
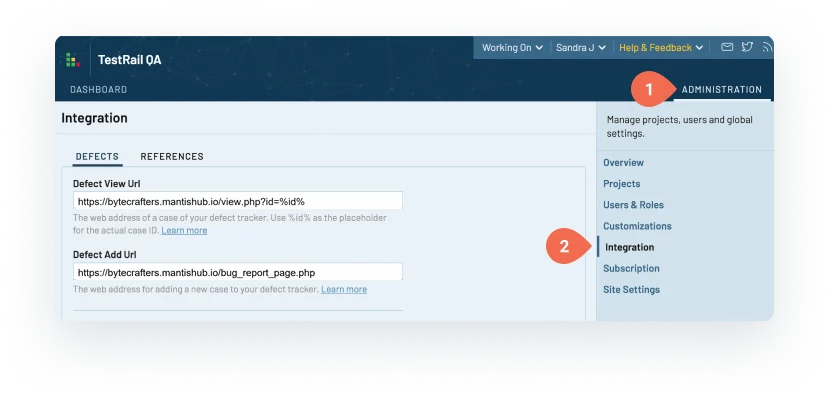
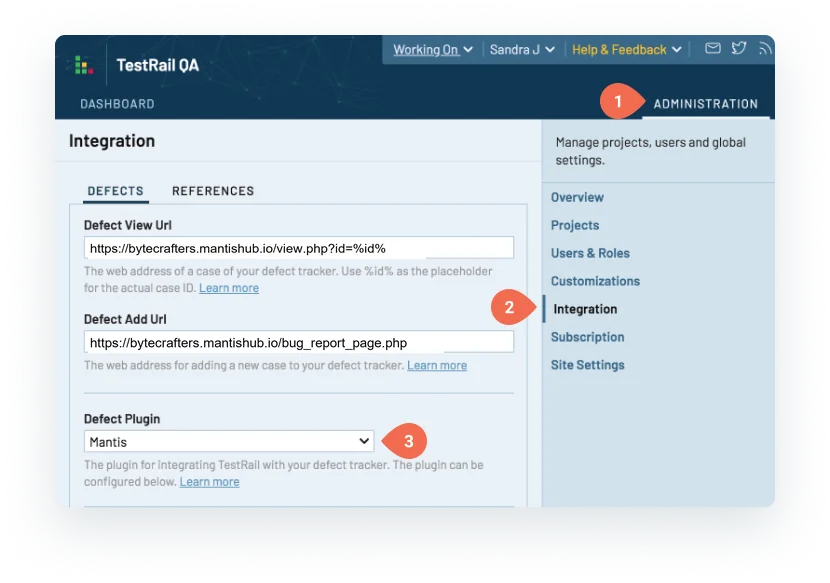
You can configure this as a global setting or on a per-project basis. To configure this globally, within your TestRail app, go to Administration -> Integration. Configure the following:
Defects View URL for your live hyperlinks. This is the web address of your bug tracker to view a case. Enter
https://yourmantishubname.mantishub.io/view.php?id=%id%whereyourmantishubnameis your personal MantisHub name and URL e.g.https://bytecrafters.mantishub.io/view.php?id=%id%. The %id% is the placeholder for the ID number you enter into your TestRail test run results.Defect Add Url for your 'Add' link. This is the web address of your Report Issues page, to report a new issue. Enter
https://yourmantishubname.mantishub.io/bug_report_page.phpwhereyourmantishubnameis your personal MantisHub name and URL e.g.https://bytecrafters.mantishub.io/bug_report_page.php
Project Configuration
To configure the Defect URLs or your Defect Plugin at a project level, enter the Project settings and select the Defects tab. Then, enter the specific project-level defect view & add URLs.
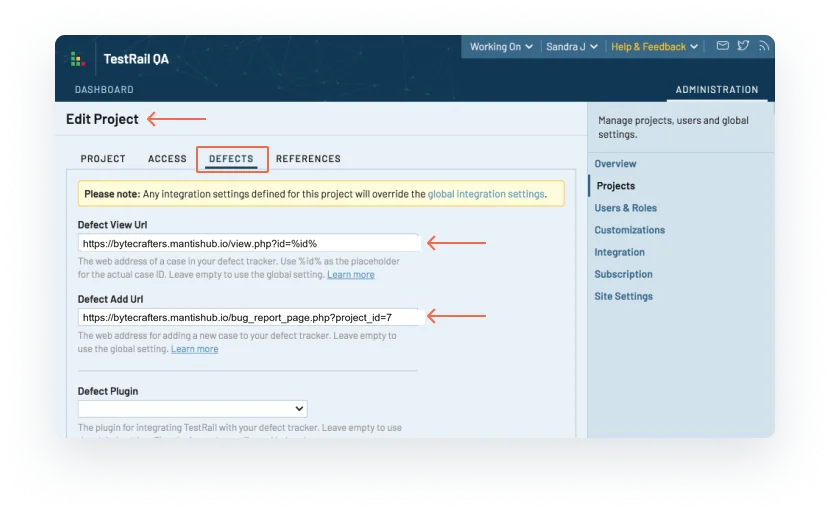
Note that using the default bug report page for the 'Add URL', will take you to the report issues page within the project you currently have set in your project filter. This may not correspond to the project in which you wish to report your test run results. For a specific project, you can specify the project ID in your 'Add URL'. To do this, at the end of the 'Add URL', you must add "?project_id=n" where 'n' is the project ID for your required project. For example, https://bytecrafters.mantishub.io/bug_report_page.php?project_id=7
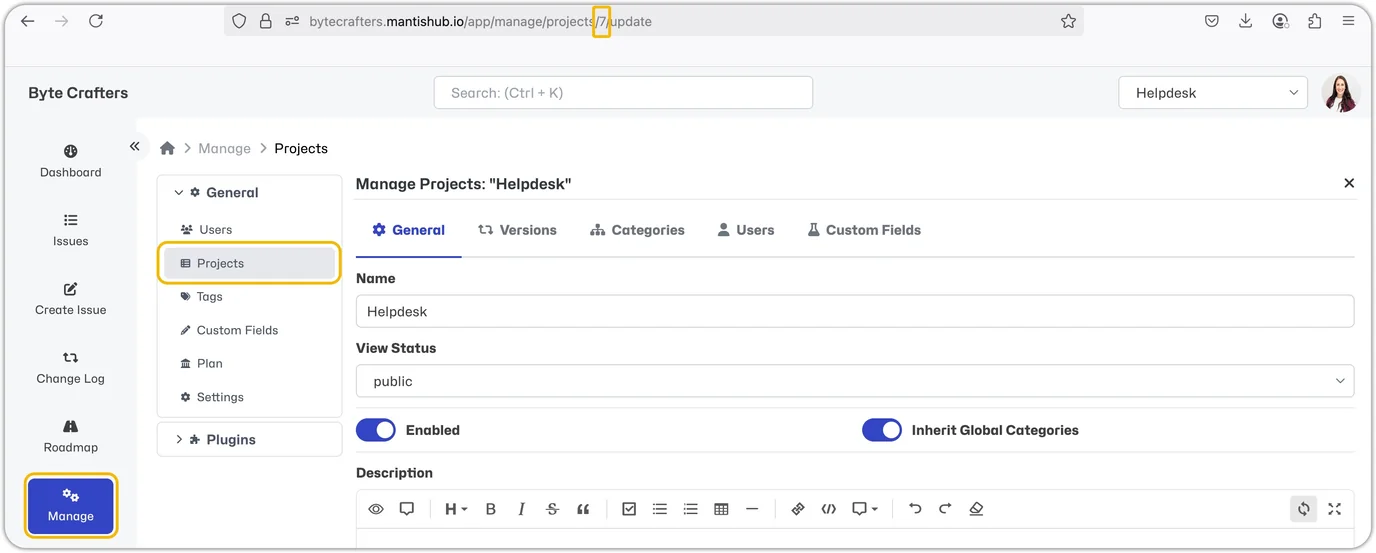
You can find the project ID within your MantisHub by going to Manage -> Projects and selecting the required project. Look at the ID number displayed in the URL. In this example, it’s 7.
Mantis Defect Plugin
You can set up the TestRail Mantis Integration either within the global TestRail settings or within the project. You can also have both these configured if you want a default integration setup to one MantisHub service but may need a different setup for specific TestRail projects. Any project settings will override the global configuration; if any project settings are blank, the global setting will be used.
For global settings, head to Administration -> Integration in your TestRail application. In the Defects tab, scroll to Defect Plugin and select 'Mantis' from the dropdown list.
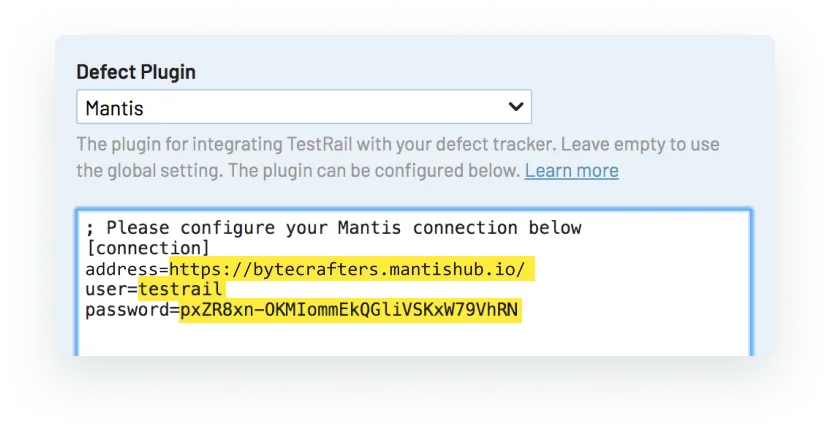
You now need to configure your connection. In the address field, enter your MantisHub URL.
You have a couple of options for the username and password field.
1. Creating a dedicated 'testrail' user.
Select a MantisHub user to report TestRail issues. We recommend you create a new user with username testrail with reporter access level. Don't forget they must be added to any private projects you wish to generate issues for. You can create the testrail user without an email address for added security and administrators can impersonate the account for access. From within the 'testrail' user account, create an API token. In your TestRail plugin configuration, enter testrail for the username and the newly created token for the password field. All 'pushed' defects will be reported under the testrail user account.
2. Using User Variables
Your second option is to create user variables and allow each TestRail user to set their own MantisHub username and password in their TestRail user settings. Using this solution means that the "reporter" of the MantisHub issue will be set to each individual user rather than a generic user.
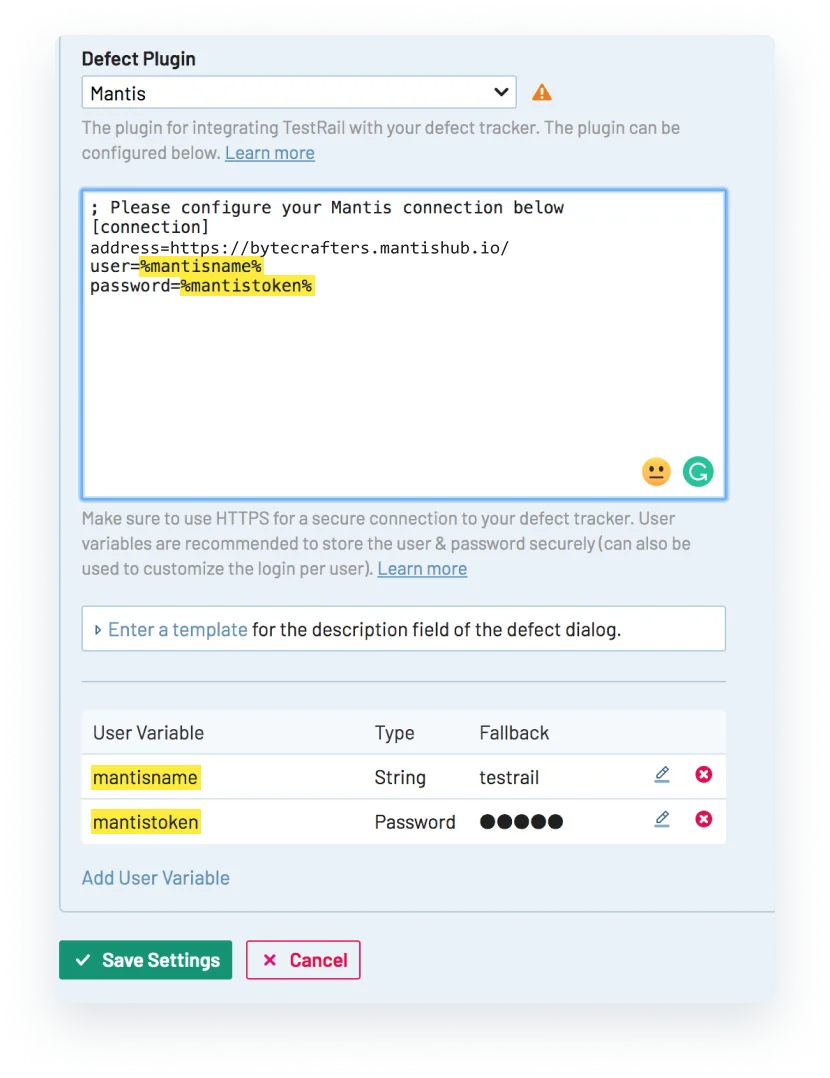
To configure this, you must define user variables for the username and password fields. You'll see a link to "Add User Variable" just below the Defect Plugin section at the bottom of the page.
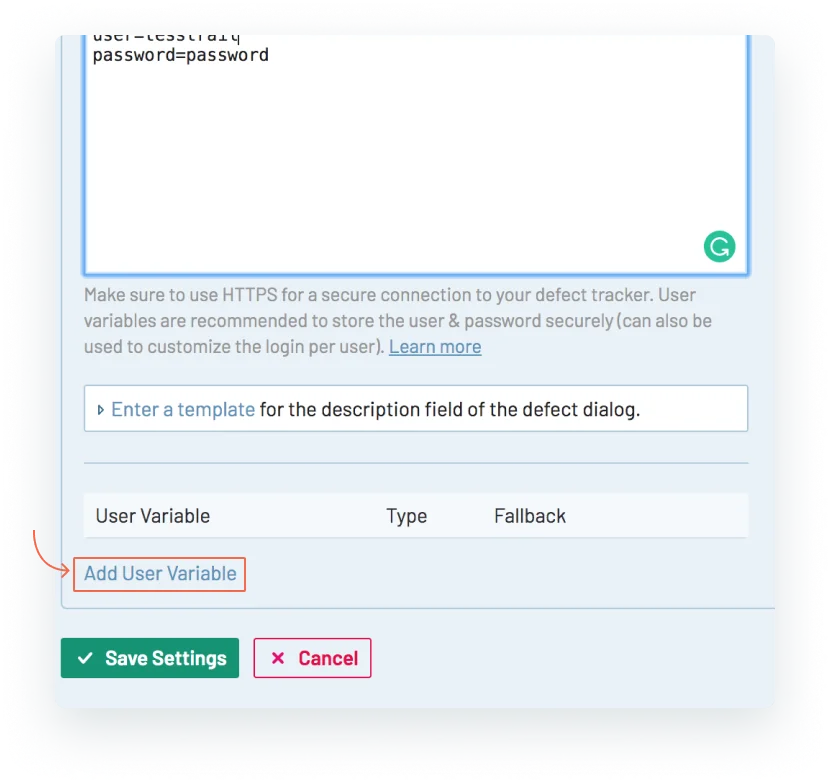
Click this link to create a variable for your MantisHub username and enter your variable details. Required fields include:
Label - this should be meaningful to users, e.g. 'MantisHub Username', as it will be displayed in the user interface under "My Settings".
System Name - for use as a placeholder e.g. 'mantisname' and
Type - for username, this will be a string.
Optionally, you can also configure a fallback or default value for users who have not defined their username. This is where a 'TestRail' user will still come in handy. But you may elect to leave this blank, which will force your TestRail user to have valid credentials to push MantisHub issues.
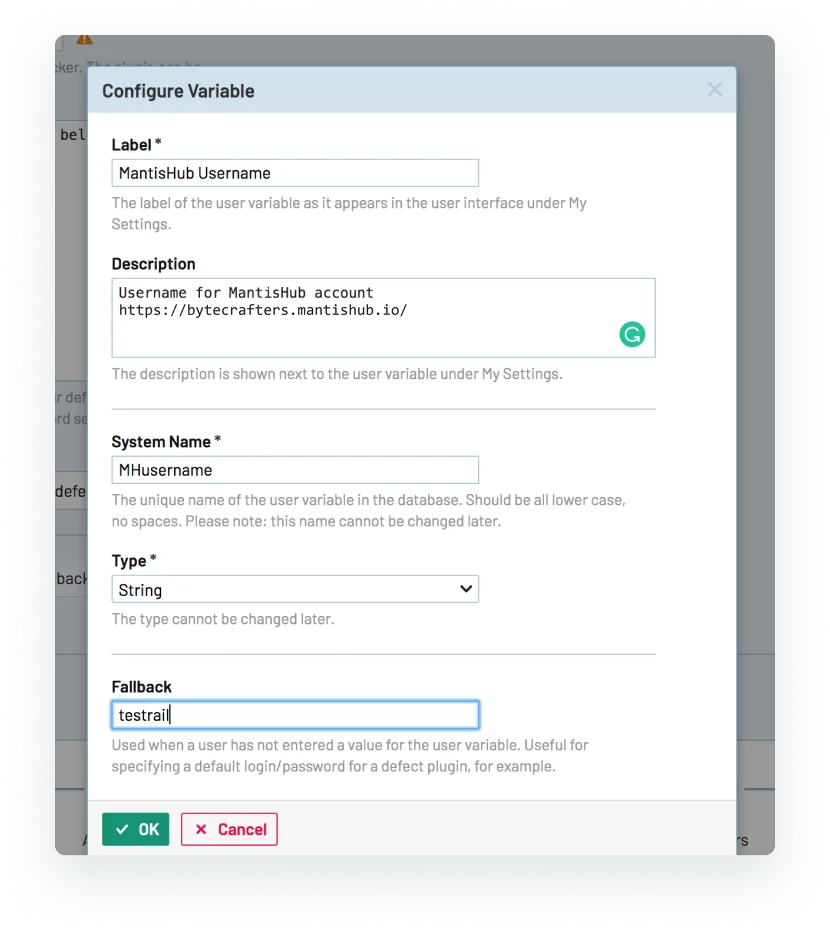
Repeat the above steps for the %password% user variable, and the Type field will be password.
Once the User variables are configured, you must set the Plugin configuration to the new variable placeholder. This will be the system names preceded and followed by a '%' e.g. username=%mantisname%
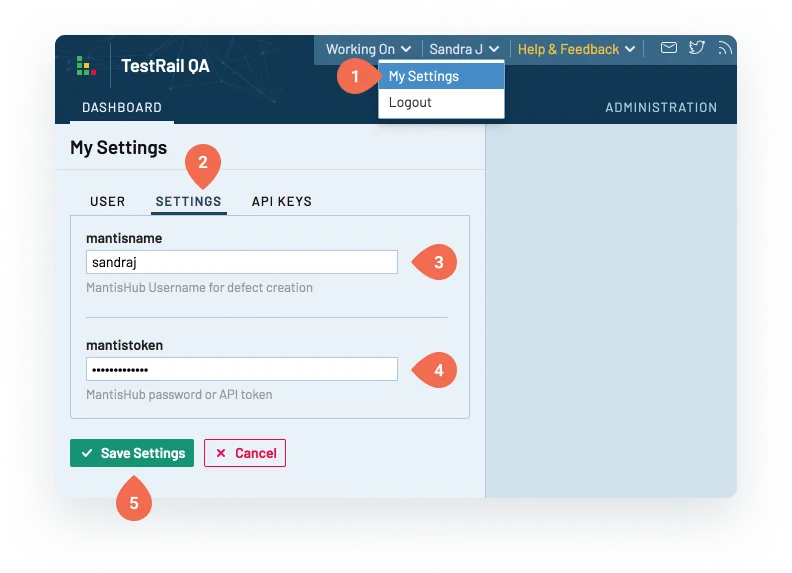
Lastly, your TestRail users will need to update their MantisHub name and password/token in "My Settings".
After installing and configuring the Mantis defect plugin, you'll see a "push" option when entering test run results.
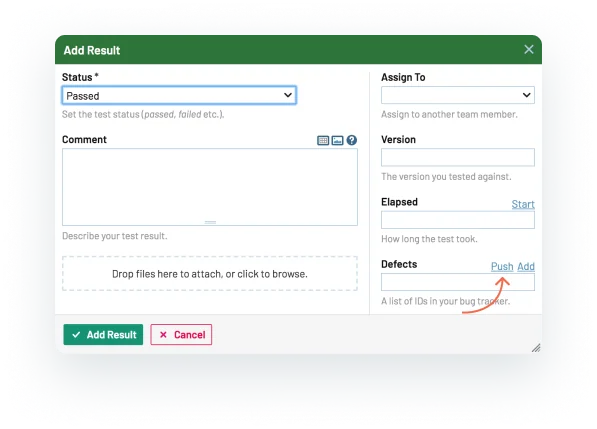
Click this to enter details for your MantisHub issue. The default values presented are shown in the screenshot below. The plugin sets these fields as required, so you will need to populate all fields. If you do not have these fields in your MantisHub service, enter any value and continue; this will not affect the creation of the new issue.
Self-hosted TestRail offers other customization options. Or you can build a whole new custom plugin integrating with MantisHub's REST API.
If you are after further customization options with your TestRail cloud solution, please contact the Gurock/TestRail team. We are happy to work with them if needed to deliver a solution.