
User Accounts
If you are still using the classic user interface, please see the Classic UI Article
Creating User Accounts
Any administrator is able to create new user accounts. Simply click on the Manage menu and select Users.
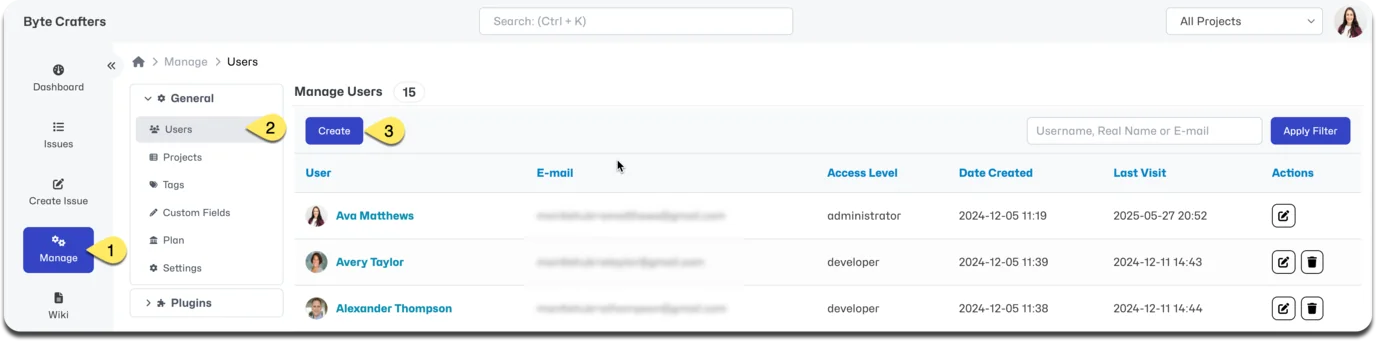
Enter a unique username (see note below), real name, email address and global access level (see User Access Levels) and click “Create”.
::: Note The system doesn't allow two users to have the same username or real name. It will also prevent setting a username that is already set as a real name elsewhere and vice versa (real name used as a username). Hence, in an attempt to create or update a user with a non-unique name, the administrator will get an error message.
To make sure you are not re-using an existing name, check your list of users. If the list of users is long, then the best approach is to use the "Search" field at the top of the users list. This field supports searching by username, real name or email address. :::
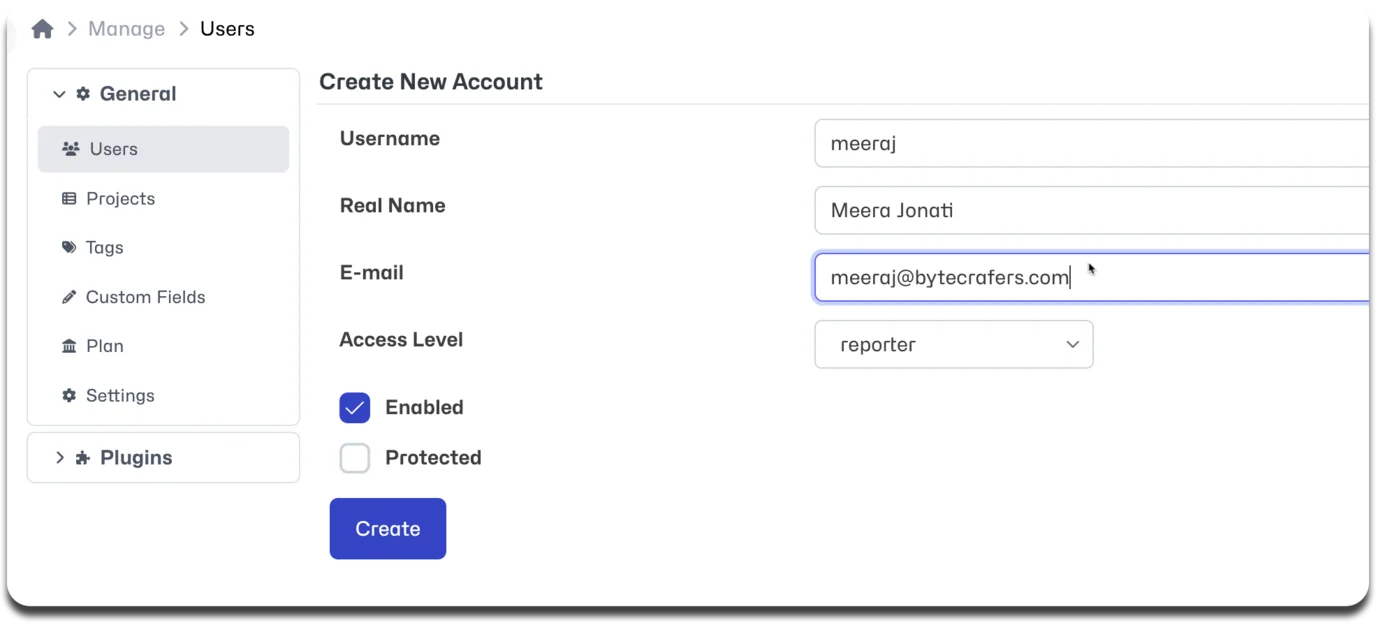
When the ‘Protected’ flag is set on a user account, it indicates that the account is a special or shared account and hence users logged in using a protected account will not be allowed to change account preferences and profile information.
Creating a user triggers an email notification to the created user enabling them to activate their account and set their password. The invitation link will expire within 7 days after which the link will no longer work and a password reset may be required.
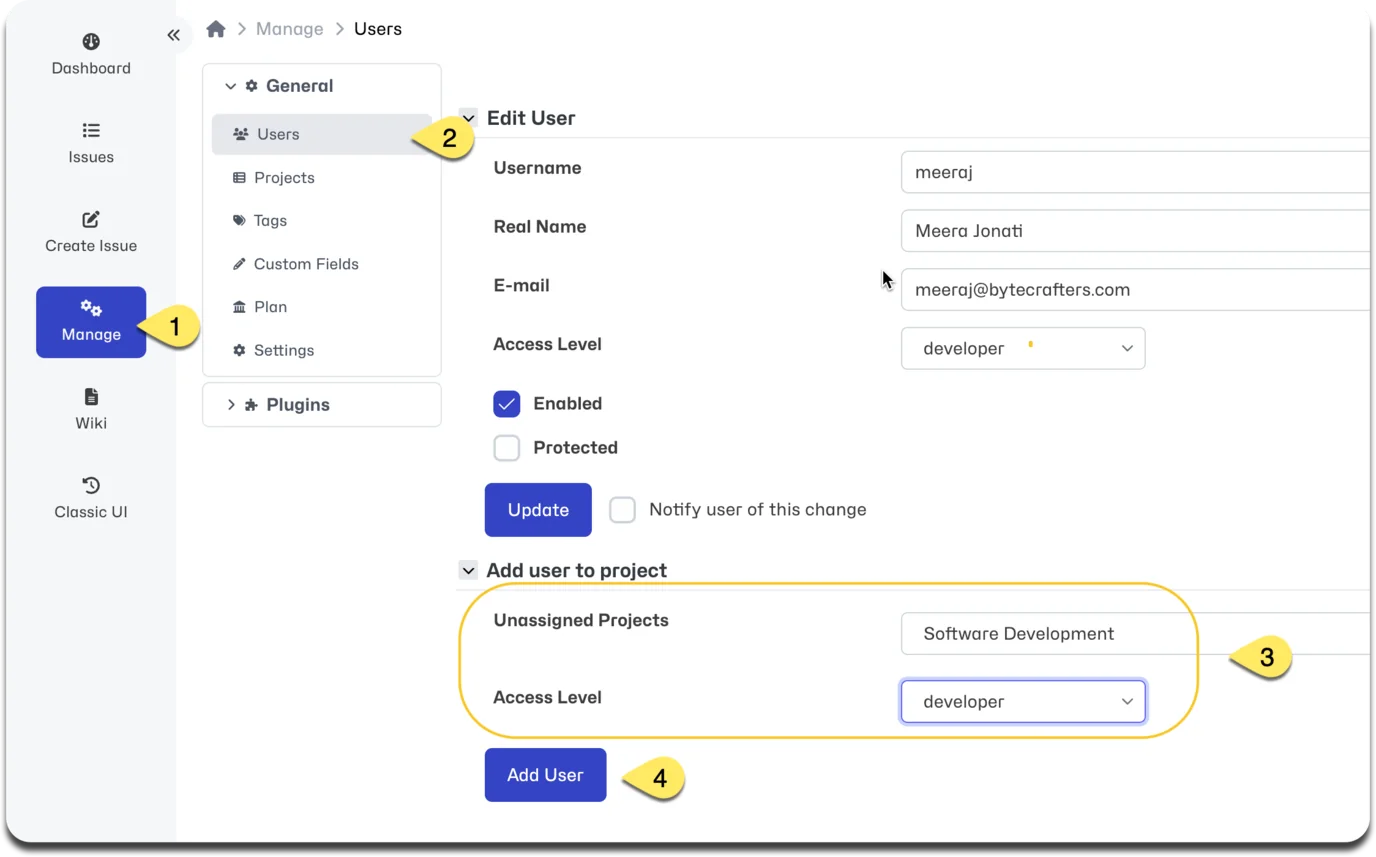
When users are created, they get access to all "public" projects by default. However, if they need to have access to "private" projects or require a different access level to a specific project compared to their global access level, then they should be explicitly added.
Under Manage -> General -> Users, click on the username in the displayed list.
In the "Add user to project" section, select the projects from the drop down list and select the project specific access level. Then click "Add User"
For more details, you can check out our Video Tutorial on Creating Users
User Access Levels
A user's access level defines what a user is allowed to do. When you create a user, you will define their global or default access level. This access level defines permissions for all actions associated with public projects unless or until the user has been added explicitly to the public project with a more specific access level. Access levels defined at the project will override global access levels.
Users who are not administrators will not have access to private projects unless added explicitly to those projects. The user's access to a private project can be lower or higher than their global access level.
Following are the access levels in MantisHub and their typical usage. Note they are hierarchical so each level has all the permissions of the levels below it.
- Viewer - login and view issues.
- Reporter - report issues and comments on issues.
- Updater - a user who can update issues.
- Developer - a team member who is able to view private issues, take ownership of issues and view reports.
- Manager - ability to manage a project including project details, who has access to it, categories, versions, and custom fields.
- Administrator - all administration tasks and communication with MantisHub support team.
Learn more from our video tutorial.
Impersonate Users
Administrators have a tool to allow them to test users accounts and access levels. When Managing users, administrators have ability to impersonate user accounts. Go to Manage -> General -> Users and select the user you wish to impersonate. Select Impersonate User from the "Actions" dropdown.
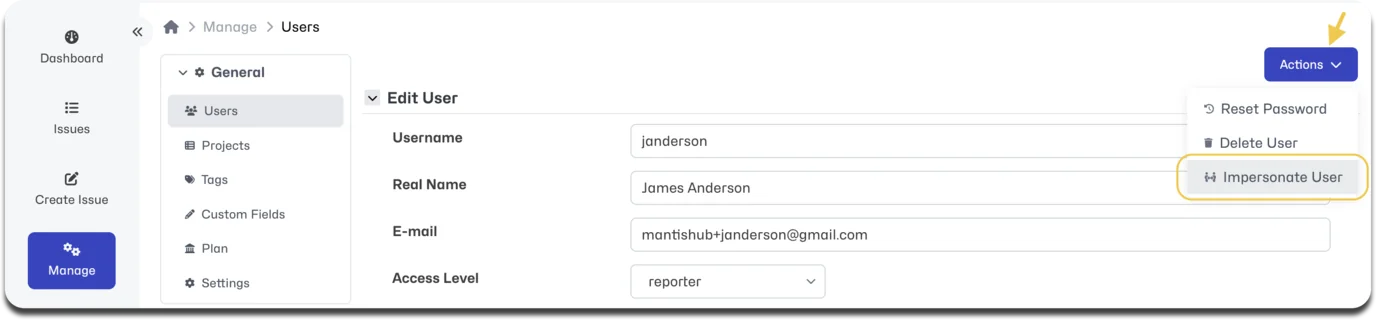
You'll then be logged into the system as that user.
MantisHub's flexibility in assigning access levels and tailoring workflows is super useful but you may want to make sure in some cases that your users can see and do exactly what you intend.
You can test and confirm that an account acts as expected. You can also use this to reproduce any system faults or issues your users might have.
That's a lot of power so only administrators have access to do this. Impersonate responsibly 😃
Disabling or Deleting User Accounts
Disabling a user
The recommended way of retiring user accounts is to disable them. Scenarios where this is useful is when a person leaves the team and it is necessary to retire their account.
Once an account is disabled the following will be enforced:
- All currently active sessions for the account will be invalidated (i.e. automatically logged out).
- It will no longer be possible to log in using this account.
- No further email notifications will be sent to the account once it is disabled.
- The user account will no longer appear as an option in lists like “assign to” and "followers".
- The user will NOT count toward your plans user allowance.
- The user will not be able to submit issues via email.
To disable users, go to Manage -> General -> Users, and click on the username in the displayed list. Then simply untick the Enabled check box and click 'Update'.
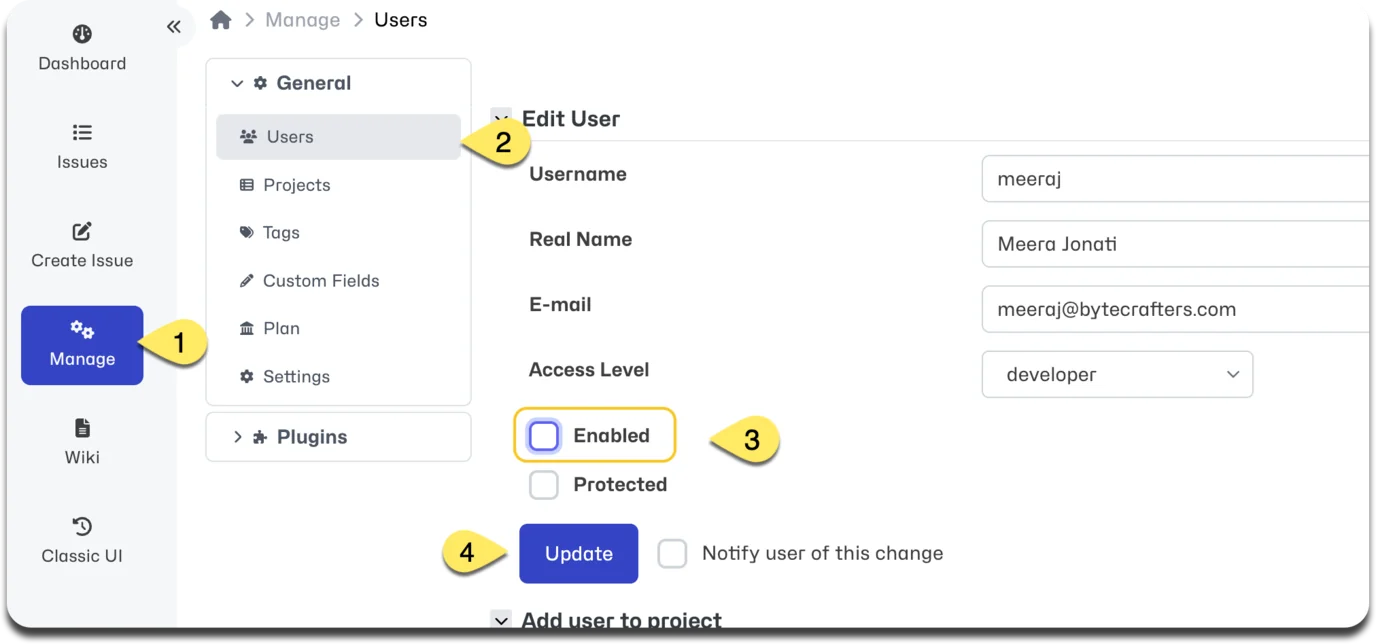
The disabling process is totally reversible. Hence, the account can be re-enabled and all the account history will remain intact. For example, the user will still have issues reported by them, assigned to them etc.
Once they are re-enabled, their permissions and history will be restored. The user will once more be included in your plan active user count.
Deleting a user
You do have the option to delete a user. Deleting a user is NOT reversible and is only recommended for accounts that have not been active, i.e. haven’t reported/handled issues or were created in error.
Once an account is deleted, any issues or actions associated with the account will be associated with a user ID (e.g., user123, where 123 is the ID of the account that was deleted). The associated issues or actions are not deleted. Any associated actions will be displayed under the user ID.
By default administrators are the only users who can delete user accounts. They can delete accounts by going to Manage -> General -> Users and click on the user. From the 'Actions' dropdown in the top right, select “Delete User”.
Deleting a user is NOT reversible. You can create a new user account for the same person but it will not have the same ID so prior history will not be visible/associated to the new account.